
I have received some comments about a previous post where I discussed the scenario of an Azure web app that needs to call a protected web service. The protected web service needs to be configured to allow access (for example via its firewall) to the outbound IP address of the Web App. You can read the whole previous post here. A few readers have had problems with this and claims that not only do they need to enter the outgoing IP of the web app (for example 13.74.185.187) but also a x.x.x.0 address (in the above example 13.74.185.0) which I had never heard about before. While I have been extremely busy lately I was very interested in these findings and wanted to try it myself and now that time has come.
This post will dig deeper into this matter and I will set up a protected service and then try to open for calls only on the IPs from the Web App (from the portal) to see what happens. Is the x.x.x.0 address needed or not?
Recap
My claim in the last post was that you should use Outbound IP address of the Web App (found under properties) and send these to the external service provider that hosts the protected web service. While the other post explained the downside – that these addresses are also used by other applications that are not yours – the main point of that post was that the outbound IP addresses found under your web app was the ones that should be opened (and no other IP addresses).

So does my claim hold or not – are these IP addresses the only ones you need to open in the firewalls?
How to verify?
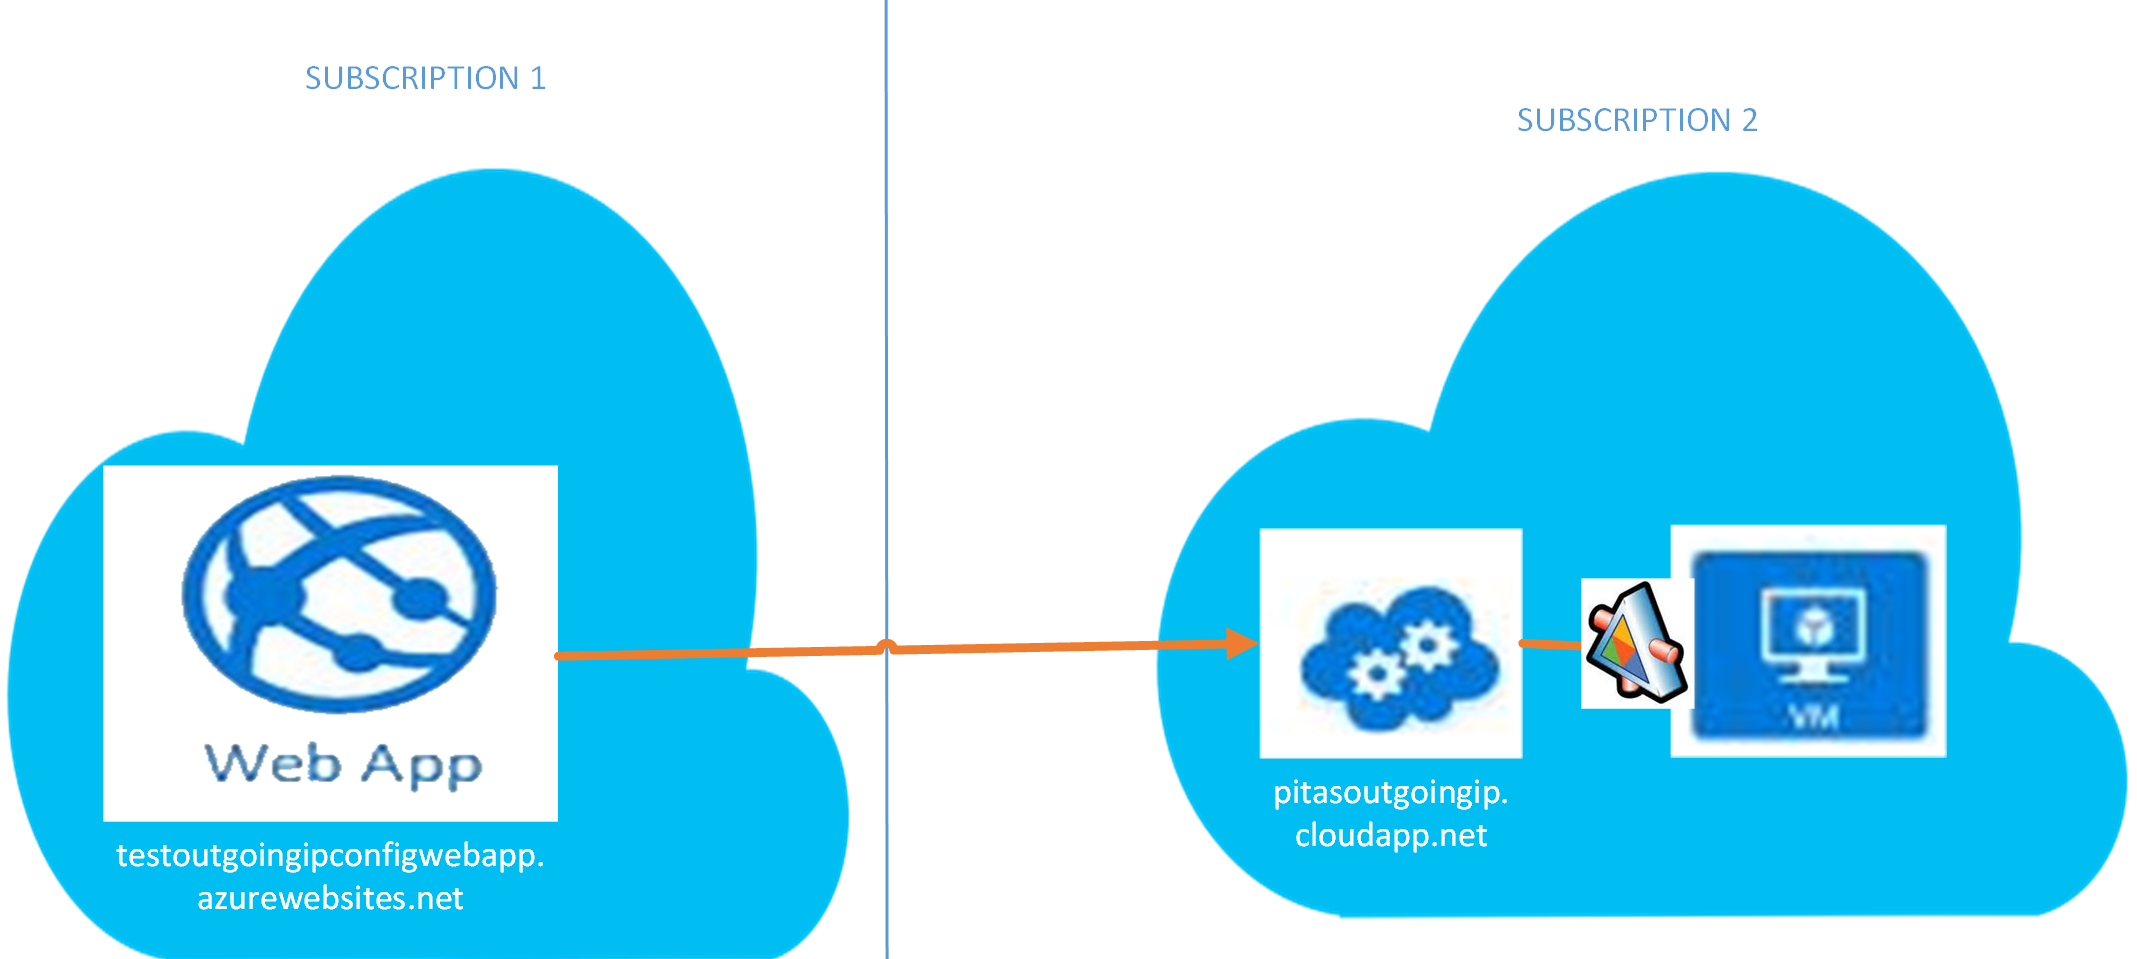
I will set up one web app with multiple instances (to increase the possibility of getting different outbound IP addresses). I will set up a classic Azure VM (the cloudapp version) for holding the “protected service” (you will understand why I used the classic one later). The protected service will just return the callers IP address through a Web API. I will put the client and server parts in different subscriptions and different datacenters just to make things a bit more realistic.
Protected Service:
- Web API site
- Azure Classic VM
- IIS (Internet Information Service) for hosting
- Windows 2012 datacenter
- West Europe Datacenter
Web App:
- 2 instances of an Azure Web App
- ASP.Net Web form, calling WebAPI protected service
- ARR Affinity off (so I don’t always arrive at the same instance)
- North Europe Datacenter
Set up the server
In the old portal I create a new Virtual Machine. The cloud service will be created at the same time. Nothing strange here.

After creation. Install the Web Service Role as well as the ASP.Net frameworks that you need.
Create “protected” Web Service
We need a simple Web Service that returns the callers IP address. So just
- Create a Web project with Web API included.
- Add a IPController as a Web Api 2.0 controller with the following code.
public class IPController : ApiController
{
[HttpGet]
public string Get()
{
return ((dynamic)Request.Properties[“MS_HttpContext”]).Request.UserHostAddress;
}
} - Publish the site to the Azure VM (see next step)
Set up IIS
I turned off the default Web Site and create a new one instead use port 80 for the web service. I copied my Web Service to the destination folder.

Set up Endpoint
Before the tests can begin I also need to set up an endpoint to the HTTP port on the server in Azure (old classic VM legacy).

With this setup all calls will pass through the cloud service port 80 (HTTP) to the port 80 (HTTP) on the virtual machine.
Set up the client
The test client
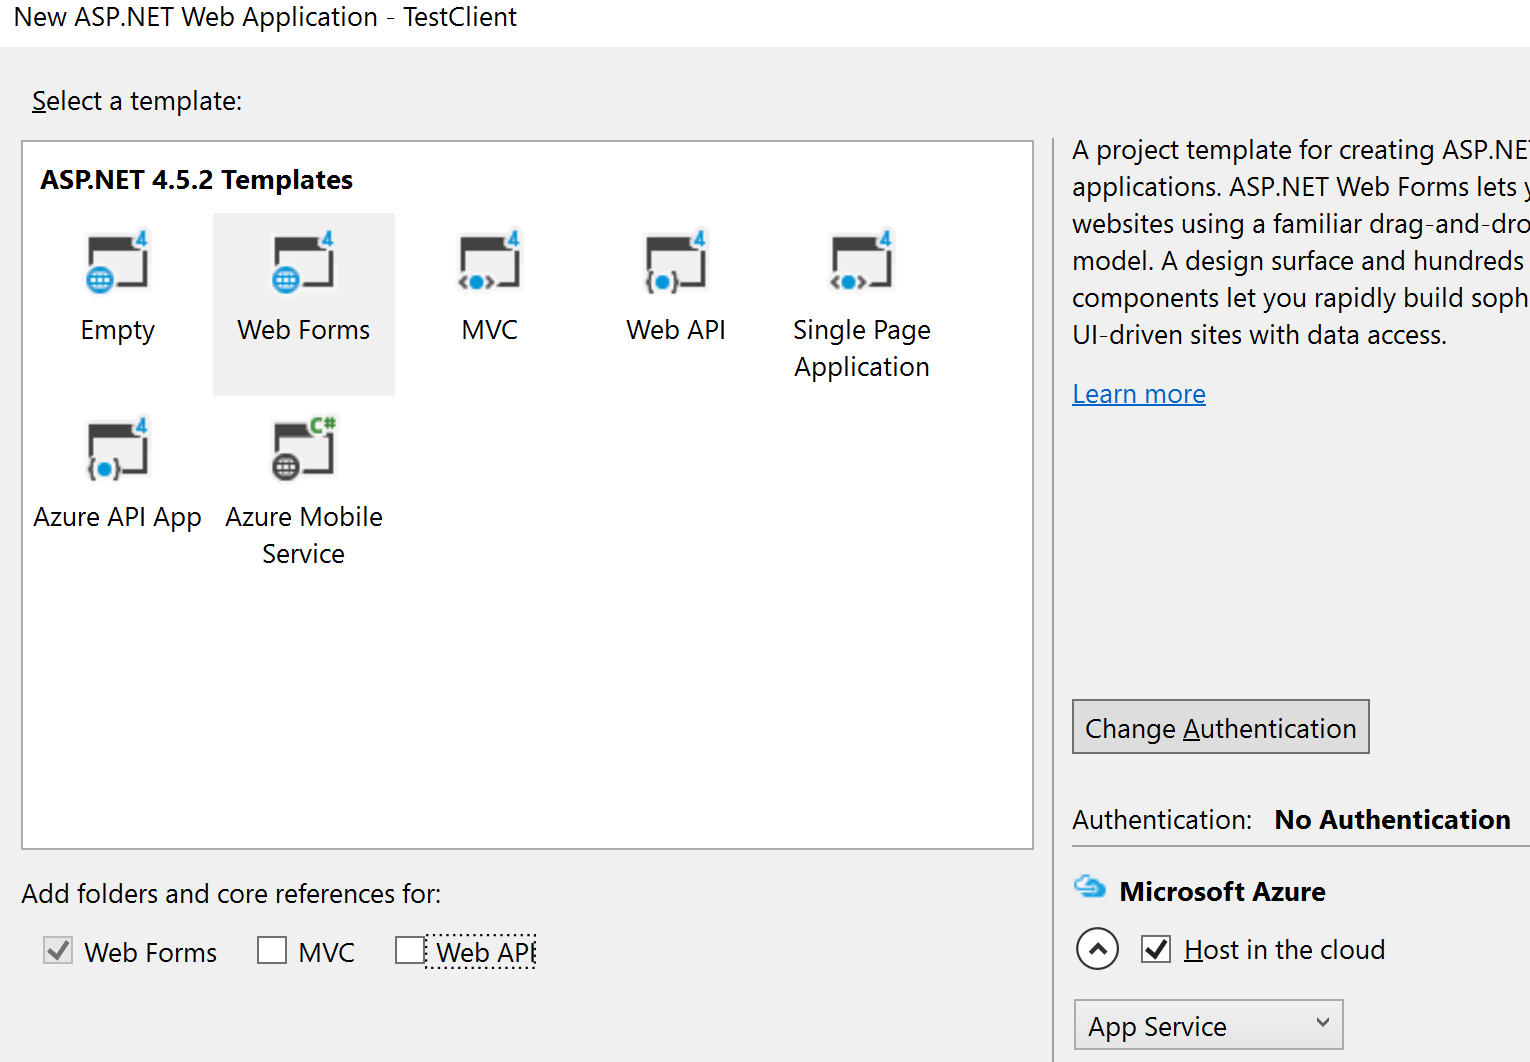
I start by creating a Web App with the cloud template for Web Application with Web Forms, no authentication.
I add a textbox to hold the returned value, a label for displaying any error message and a button to send requests to the protected service with a simple UI.

The code for the button is the below one.
protected void cmdGetIP_Click(object sender, EventArgs e)
{
string serviceAddress = “http://pitasoutgoingip.cloudapp.net/api/IP”;
txtMyCallerIP.Text = “”;
WebClient webClient = new WebClient();
try
{
string receivedMessageBody = Encoding.UTF8.GetString(webClient.DownloadData(serviceAddress));
txtMyCallerIP.Text = receivedMessageBody;
lblFeedback.Text = $”Fetched IP at {DateTime.Now.ToLongTimeString()}“;
}
catch (Exception ex)
{
lblFeedback.Text = $”Error at {DateTime.Now.ToLongTimeString()}.\n{ex.ToString()}“;
}
}
After this the test client is complete and I published the solution to Azure.
Test
Test without protection

Above you can see two different results to the left (likely from the two instances). If you re-run the test you may end up on the same instance or the other one (I used two instances). This indicates that the IP address that the Client Tester Web App identifies its instances with uses the ones from the outbound ip addresses from the portal and that ARR Affinity works as intended. So far so good.
But a few people claimed that they needed to open more IPs than the ones listed above. So lets continue testing but try to secure the services. I will do this in two ways. 1) with ACL rules in Azure and 2) with firewall rules on the server itself.
Protect with ACL
I will now set up some ACL rules (Access Control Lists) for preventing access from all but the allowed IP addresses from the portal to access the services. I was a bit lazy when I set up the servers and used the legacy VM model (classical) because it is very easy to set up ACL in the old portal (and saved me some time). Normally you would create the modern version of VMs. Anyway, in the old portal, I browsed to my VM, selected the HTTP endpoint and pressed the “Manage ACL” button.

So its just to start entering the outbound IP addresses here right?

Nope, this wont work. The label says remote subnet and not IP address. I am not the right person to explain the IP subnet functionality and absolutely not in this post so I will just conclude that IP addresses fall into certain subnet ranges that can define a range of IP addresses. The subnet differs from an IP address that a subnet can define a range of IP addresses instead while a specific IP is just one instance.
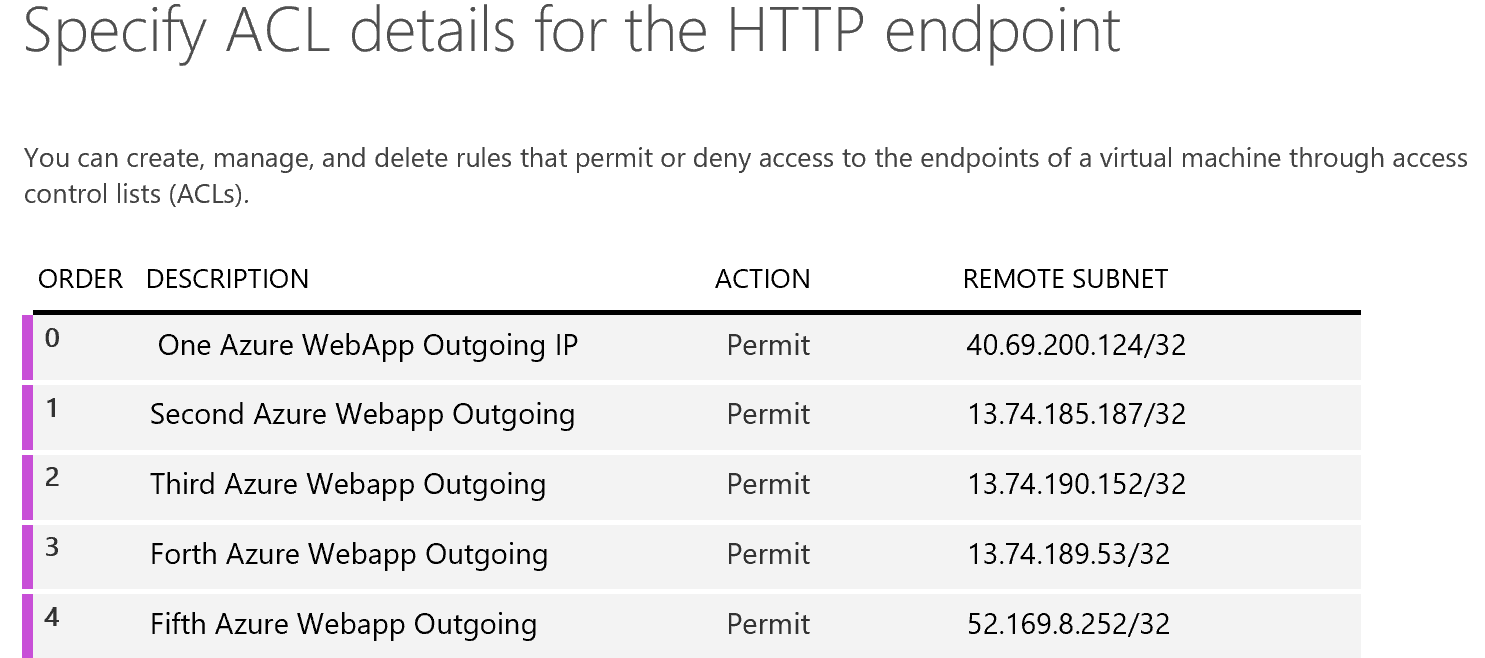
So how do we get the right ones for this test. We know that the web app (in my example – you’ll have to check yours) should identify itself with one of the following IP addresses: 40.69.200.124,13.74.185.187,13.74.190.152,13.74.189.53,52.169.8.252.
You can use a tool for determining the subnet, for example https://mxtoolbox.com/SubnetCalculator.aspx. Make sure you select only one IP Address in the dropdown. If you are unfamiliar with subnets, you will quickly learn that /32 subnet will always be the subnet for a single IP address so you can basically use /32 for all the outbound IP addresses from the web app in the ACL setup. This will make sure that you only open for individual IP addresses. I like the tool however, and it could be useful if you want to open for a range of IPs on the same network (think hybrid solutions). As an example /29 will give you 8 addresses (from 13.74.185.184 – 13.74.185.191).
The correct setup
So I enter the 5 different outbound IP addresses from the Web App with suffix /32.
If I re-run the same tests again the Azure web app should work, but If I call from my own machine it should fail.

Perfect! Now lets just for the sake of it disable one of the IPs from the Web App outbound IPs and make sure that there is no Azure backdoor allowing access anyway.
Negative test
To test that it will block within Azure also I set up the ACL rules negatively. I will only allow the first Outgoing IP.

After denying the other four subnets from accessing the protected service. I tried again, the expected outcome was that only if I call from the 40.69.200.124 Outbound IP address the service will answer.
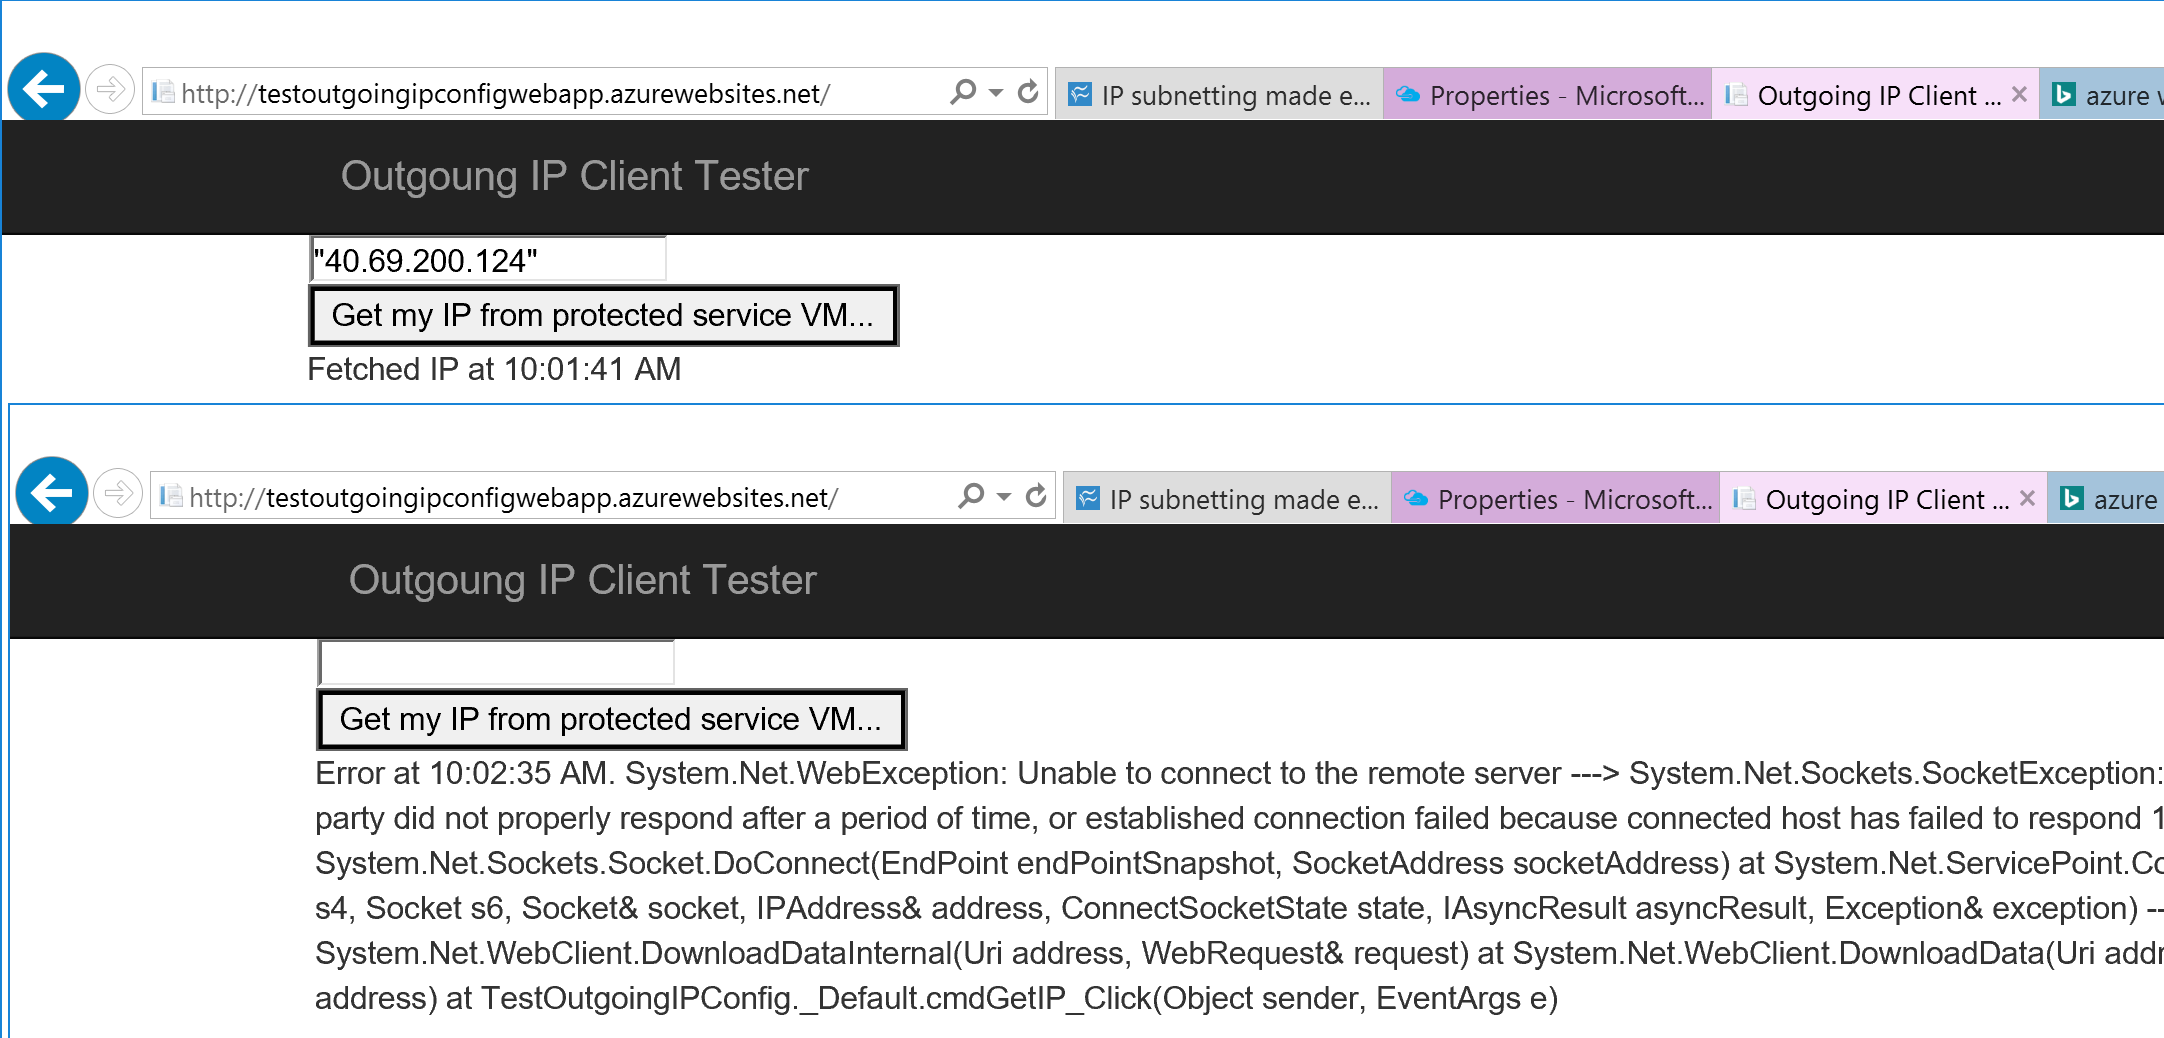
This also worked fine. As long as I got the correct outbound IP (likely same web app instance) it worked. But when I used another – the access was denied to the service.
What about the x.x.x.0 addresses?
But some of the comments from the other post seems to indicate that you need to open the x.x.x.0 address as well! Lets make one more try. I will actively block the .0 addresses in ACL and only allow the ones from the portal.

Expected behavior is that the Web App should still work.

And this is exactly what happened.
Protect with Firewall
So lets try the same thing but now by blocking through the windows firewall. Don’t forget to remove all the ACL rules to allow all traffic to make the test properly.
I will just make a short tests with configuring the HTTP ports in windows firewall to verify the same outcome as with the ACL.

So this should only work if I call it from the 40.69.200.124 address.

So just as with ACL the windows firewall blocks out everything not in the allowed IP addresses. There was no need to open the 40.69.200.0 address as well.
Conclusion
There is nothing in my tests that seems to indicate that you need to open any other IP addresses than the ones specified as outbound IP addresses in the Web App portal. There are no indications in my tests that indicates that the x.x.x.0 address has any meaning at all.
I did however still use Azure to Azure communication, though in different data centers and on different platforms (Web App vs VM). An even more thorough test could be performed by setting up the host service on another hosting platform (on premise or at another cloud provider).
While I don’t doubt that some people have had experiences where x.x.x.0 had been forced to be opened to get their specific solution to work I cannot explain the .0 address issue. It could be something specific to some technology, hardware or how it interprets the incoming call or in worst case a service that is setup incorrectly. Technologies like reverse proxy servers could also make the setup more complex.
I think that in most cases and for most people you should not have to care about any other address than the ones in the portal. As far as this blog, that is dedicated to the Microsoft cloud services, is concerned I still claim that the absolute majority of users will solve its IP configuration issue for the intended scenario by using the outbound IP addresses of the Web App.


One thought on “Web Apps: Outgoing IPs – follow-up post”