
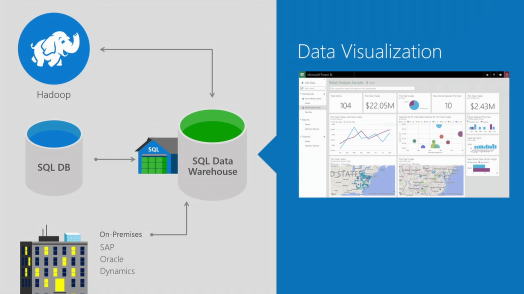
One of the topics highlighted on the AzureCon virtual conference was the data warehouse functionality. A true high performing giant size data warehouse running as a service (PaaS) in Azure (with all the benefits of not needing to create VMs, setting up load balancing etc as the IaaS services). It gives you the possibility to use sources like SQL Azure, Hadoop and on-premises resourses and has a deep integration with Power BI and makes a very attractive starting place to set up your cloud based data warehouse (especially attractive for companies with much data in Azure). Other features that will come in handy are the possiblities to scale up/down based on need (even pause/resume). This means that you can scale up to handle the monthly invoice period but scale down to low processing power the rest of the month.
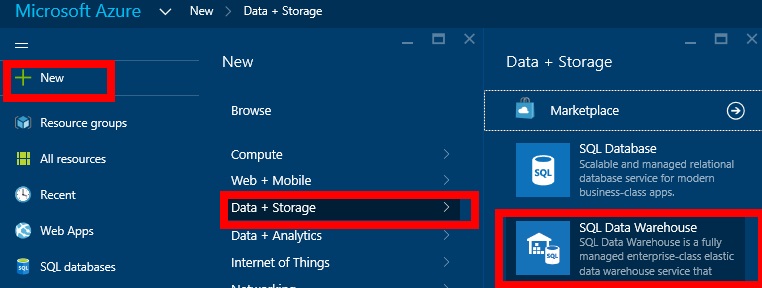
To get started you have to enter the “new” portal (portal.azure.com).

When you create your data warehouse you select the number of DWU’s to allocate (don’t worry you can change this after it is set up so the initial value is not very important), you select a database, location and resource group. One nice thing to help you get started is that you can actually load it with a sample dataware house based on the AdventureWorks database directly to start testing. It goes without saying that you can create an empty data warehouse from scratch also.
An interesting feature is the ability to pause the data warehouse. When pausing the only thing you pay for is the storage which is one of the cheapest functionalities on the azure platform. This is a usefull way for people using a limited amount of credits (like MSDN subscriptibers) to save our monthly credits but it could be useful for corporations also that have a periodic bursting scenario of their data.

The button bar offers the below options

- Settings: Allows you to view the configuration you made when setting up the data warehouse, see the impressive max size of the database, adjust the scale in the scale sub section, enable auditing etc.
- Open in Visual Studio adds the database to the server explorer in Visual Studio (don’t forget to open the firewall if you created a new database)
- Open in PowerBI. Opens the PowerBI section (don’t forget to open the firewall if you created a new database)
- Scale is the same slider as is a part of the settings/scale part
- Delete is self explanatory isn’t it
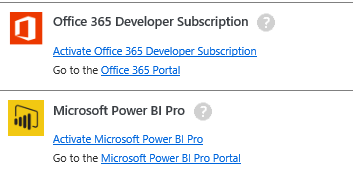
To get started with Power BI you (seem to) need a office 365 account (If you are a MSDN subscriber you can activate Office365 from msdn.microsoft.com). At least on higher subscriptions you have access to Power BI Pro also.
Update 2015-10-05: Whether you need the pro version or not is still a question mark. Early indications suggested that it was required as we got an error message that the features was “…only available in Power BI Pro”. However after further tries with my colleagues computer we seem to be running Power BI vs Azure DW without any power BI license at all!!
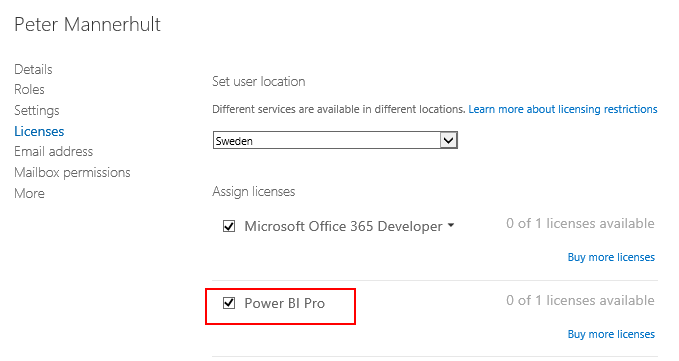
Update 2015-10-02: MSDN Subscribers: If you are going to use Power BI Pro then make sure you assign the Power BI Pro license to the office 365 user to be able to use the Power BI tools. Do this by signing in to office 365 portal.
After you have prepared your Office 365 account – press the “Open in Power BI” button. You will now go through a short wizard to connect Power BI with the Azure Data Warehouse.

Just enter your credentials from when creating the data warehouse.

… and you can now create your reports and work with dashboards.

